
How to install Jupyter Notebook ?
Introduction
Do you want to start developing code ? Find a tool that can be read by everyone, as part of a team project ?
Jupyter Notebook is a dynamic, versatile tool that will seduce you. Here, we give you some tips to better understand it, in order to use it perfectly.
Jupyter and its notebooks
What is Jupyter and how can you do more with your notebooks ?
Jupyter Notebook is a free tool, launched in 2015. It is very popular with data scientists, but not only. The name “Jupyter” is a contraction of Julia, R and Python, three different programming languages.
The term “notebook” is used to describe the versatility of the tool. In just a few years, it has become an indispensable tool for a large number of users !
With Jupyter Notebook you can write code and run it on the same platform. It is also possible to “document” your code, i.e. explain what each part of your code will do.
A working tool for all languages
Today, you can use up to 40 different programming languages on Jupyter Notebook. This is particularly conducive to teamwork.
Jupyter Notebook is accessed via a web application.
You have two options:
- launch Jupyter on your own computer
- launch Jupyter on a remote server. This last option is ideal for sharing your work with your team.
What is the purpose of Jupyter Notebook ?
With Jupyter, as the result of your code is visible at the same time as the code itself, you do not have to send two separate files. How convenient!
A real asset if you are working on code in development!
In addition to code, Jupyter helps you produce and share a wide variety of content: text, graphs, mathematical equations… In an interactive document, you can simultaneously find your code and visualise it.
Another advantage is that Jupyter is readable on a wide variety of media. This means that a colleague of yours who uses a different system, such as Google Collab, will be able to view your code and modify it.
How does Jupyter Notebook work?
Three different elements make up Jupyter Notebook: the notebook, a kernel and a web application.
The notebook
The notebook is an .ipynb file. Within the notebook you will find your code, but also the output of that code, as we have explained. This is also where you can modify the code.
The kerne
Secondly, the kernel is a programming language support for the Jupyter Notebook application that launches the code and runs it.
The web application
Finally, it is on the web application that the code contained on the notebook will be displayed.
Jupyter Notebook is therefore a special tool because of its notebooks and their readability on a variety of media. The fact that it opens via a web application also gives it a certain flexibility.
How does Jupyter Notebook facilitate data analysis?
The benefits of Jupyter for data analysis
Jupyter Notebook offers many advantages for data analysis.
First of all, it is very easy to access. As we have seen, all you need is a web application. You can even access it via your tablet or smartphone! You also don’t need to update it.
Unlike other platforms, the code displayed is dynamic. Have you ever wanted to see how a code is displayed when you work on it? Now you can with Jupyter.
And as explained above, Jupyter is supported by a wide variety of media, and readable by many. Perfect for fostering effective teamwork.
The disadvantages of Jupyter for data analysis
It is however important to keep in mind these few limitations of Jupyter notebook:
- The Jupyter Notebook tool is not self-contained. To launch Jupyter, you have to go through Anaconda or Python. But once that is done, it is easy to launch Jupyter.
- It is difficult to save the state of a session. You have to re-execute the code each time to find it.
- There is no IDE (development environment) integration on Jupyter Notebook. So there is no interactive debugging or code completion.
Jupyter Notebook use cases
Jupyter is used to visualise data in a very efficient way, with explanations.
For this reason, Jupyter is very popular in data science, mathematics and more generally in research. Indeed, it gives an efficient view of equations and formulas. It is also used in artificial intelligence development projects.
But because it allows dynamic content to be displayed, the tool is also popular with bloggers and web developers.
Indeed, they appreciate its interactive nature. They explain that they like to combine their passion for blogging and coding at the same time, via Jupyter !
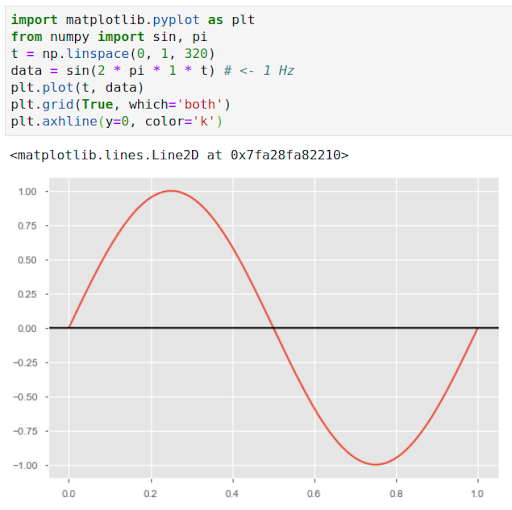
An algorithm created by a Medium blogger on Jupyter to measure the frequency in Hertz of her song.
On her Medium blog, a user explains that she uses Jupyter as part of a music theory study.
Thus, Jupyter Notebook is not only used by scientists: it is also adopted in the field of art, music… Today, it is even used by the teams of Netflix to code the algorithm that will propose movies according to your preferences!
The tool is therefore very interesting as it allows different fields of study to be combined. Jupyter Notebook is really versatile and promotes interdisciplinarity.
How to install Jupyter Notebook?
There are two different ways to install Jupyter Notebook: with Anaconda, and from Python. We will detail each of these methods.
Installation with Anaconda
One option is to go through the distributor Anaconda, by visiting their official website. The steps to follow are as follows:
- Download the version of Anaconda that fits your computer.
- Run the Anaconda runner once you have downloaded it.
- Once on the Anaconda browser, choose “Launch” to start Jupyter.
And that’s it!
Installation from python
To install Jupyter Notebook via Python, follow these steps:
- Open a console via File Explorer.
- Enter the following command: pip3 install –upgrade pip
- And then you have to enter: pip3 install jupyter
And it’s done!
Some tips to increase productivity with Jupyter
Finally, we will share with you some essential tips to be even more productive with Jupyter Notebook.
Essential keyboard shortcuts for your notebooks
In general, keyboard shortcuts help you to work faster. Jupyter is no exception to the rule! To make your life easier, this tool offers you a multitude of keyboard shortcuts.
Here are some examples – Jupyter keyboard shortcuts, listed by a user on Dataquest:
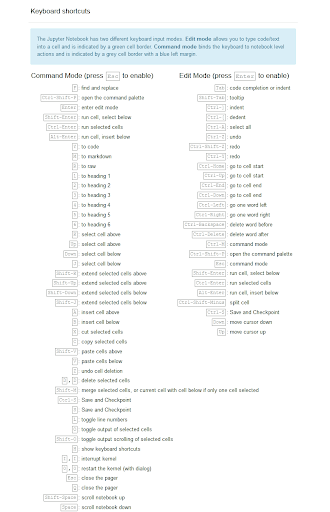
The number of keyboard shortcuts on Jupyter notebook is seemingly endless, as shown in the document shared by this user.
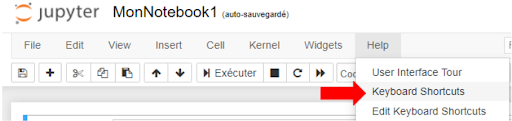
On her blog, a user shows how to access the directory of all keyboard shortcuts
You can access the full list of shortcuts via a simple command, using the action mode keys + m, or by selecting “Help” and then “Keyboard Shortcuts”, as shown in the image above.
We will share some of them with you. Simple and effective, they will make your daily life easier in your use of Jupyter notebook!
To edit content here are some useful shortcuts:
- To comment on a line of code, simply use the Ctrl + / keys. To execute a cell, the function is Ctrl + Enter.
- When editing someone else’s work, or your own, you can use “tab” to complete a line of code.
- With the “shift + tab” function you can access the contextual help of an existing function.
Remember that the classic shortcuts for copying text (Ctrl + V) or pasting text (Ctrl + C) are also valid.
When you are in command mode, these are the shortcuts you will use:
- “A” inserts a box above the box you have selected. “B” (for “below”) allows you to add a box below your cursor.
- With the “C” function you can copy one or more cells.
- Pressing “D” twice in succession allows you to delete one or more of the cells you have selected.
- Finally, pressing the “Z” key will cancel the operation you have just performed.
If you want to go back to edit mode, just select the cell you want and press enter. Turning a text cell into a code cell is also easy: press action mode + y.
Make your life easier by using “magic commands
As with keyboard shortcuts, there are a number of “magic commands” in Jupyter notebook that will help you analyse your data. To find the full directory of these commands, enter the following line of code in your notebook: %lsmagic
This will give you a list of all the magic commands in Jupyter Notebook.
As a service to you, we will detail a small selection of these “magic commands”:
- With %whos you will see all the functions, variables, or modules that have been implemented in this notebook.
- %history lists the history of commands that have been issued in your notebook
- With %pinfo <variable>, you will get detailed information about a given variable.
- %load <file_name> allows you to load an external file onto a cell.
Conclusion
We have explored for you the practical and simple features of Jupyter Notebook. You have seen that it is an easy-to-use, yet feature-rich tool.
At ALLONIA the Jupiter Notebook is an integral part of the ALLONIA platform.
No more excuses not to adopt it !